Control
Introduction
Control is a tool, that allows you to
- view objects moving along their trajectories
- view objects moving backwards along their trajectories
- view collisions of objects moving along their trajectories
- record objects moving along their trajectories (with their collisions)
- export recorded videos
Control requires additional third party software to record and export videos. Namely, it requires python PyPNG module and FFmpeg codec.
Usage
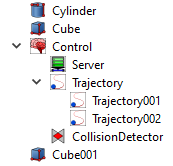
an example Animate tool tree.
- Install Animate workbench if you haven't done so already.
- Open a file in FreeCAD.
- Select Animate workbench on the workbench toolbar.
- Click on control's icon on Animate toolbar or select control in Animate menu.
- Open a Combo View ( View > Panels > Combo View ).
- Put some existing trajectory, collision detector and server tools inside control tool.
- Select control tool in a tree view on a Model Tab inside the Combo View.
- Go to Timing properties on a Data Tab inside the Combo View.
- Set up Start Time, Step Time and Stop Time so that desired Timestamps of trajectory tools are in that range.
- If you want to record sequences and export videos
- Install necessary third party software.
- Select Export Path into a directory where recorded sequences will be saved.
- Set Video Width and Video Height.
- Double click the control tool in the tree view on a Model Tab inside the Combo View.
- A control's dialog is opened on a Tasks tab inside the Combo view.
- Use a slider in the control's dialog to skim through the range you specified or click
- PLAY - to view objects following their trajectories
- REWIND - to view objects moving backwards along their trajectories
- RECORD - to record objects following their trajectories into a set of images
- PAUSE - to pause playing, rewinding or recording
- EXPORT - to export recorded sets of images into a video
- Change more properties according to your preferences, their meanings are explained in the properties section.
Third-party software
Installing python PyPNG module on Windows 10:
- Check that you have internet connection.
- Open a command line window with admin privileges (Win + X, A).
- Go to
bindirectory in FreeCAD's home folder - probablyC:/Program Files/FreeCAD 0.18/and if not, then- Open FreeCAD
- Open a Python console ( View > Panels > Python console ).
- Type command
FreeCAD.getHomePath()to obtain FreeCAD's home folder path.
- Type command
python.exe -m pip install pyPNG
Installing python PyPNG module on Ubuntu 18.04:
- Check you have internet connection.
- Open a terminal.
- If you installed FreeCAD using Personal Package Archives (PPA) and
sudo apt‑get install freecad - Type command
sudo python.exe -m pip install pyPNG - or
pip install pyPNG
depending on which is connected to correct python version (if you have both 2.7 and 3.x.y) - If you installed FreeCAD using snap or software center
- If you installed FreeCAD using an appImage
No way how to install additional python modules has been found yet. So exporting videos with automatically saved framerate is unavailable.
No way how to install additional python modules has been found yet So exporting videos with automatically saved framerate is unavailable.
Installing FFmpeg codec on Windows 10:
- Go to FFmpeg site.
- Download the latest FFmpeg build for your Windows version (64bit/32bit).
- Extract it from an archive.
- Put its contents (folders like
bin,docetc. and files likeLICENSE.txtandREADME.txt) intoC:\ffmpegfolder. - Add
C:\ffmpeg\bin\to your Windows 10 path (edit the system environment variables).
Installing FFmpeg codec on Ubuntu 18.04:
- Open a terminal.
- Type
sudo apt‑get install ffmpeg
Properties
| Property / Property Group | Description |
|---|---|
| Base | FreeCAD properties necessary for correct display in the tree view. |
| Label | Name of this control tool shown in the tree view. |
| Group | A list of children to be shown in the tree view. |
| Record & Export | Properties controlling look of a coordinate frame. |
| Export Path | Path to a folder where recorded sequences of images will be stored as well as exported videos. |
| Video Height | Height of recorded images and exported video in pixels. Height range is from 32 to 4320. |
| Video Width | Width of recorded images and exported video in pixels. Width range is from 32 to 7680. |
| Timing | Properties setting up a range in which children tools are controlled. |
| Start Time | The beginning of a controlled range. Must be smaller number than Stop Time and can be negative. |
| Step Time | Step time between shown frames. Must be in range from 0.01 to (Stop Time - Start Time). |
| Stop Time | The end of a controlled range. Must be greater number than Start Time and can be negative. |